ベンチマークツールとして人気のある wrk と vegeta の動作確認をします。macにそれぞれのツールをインストールして、簡単な負荷テストをしてみます。
前準備
動作確認用の負荷試験サーバーを作成
expressを利用して、動作確認用の負荷試験サーバーを作成します。必要なパッケージをインストールします。
npm init
npm install --save express multer
app.js を作成して、以下処理を記述します。
const express = require('express')
const app = express()
const bodyParser = require('body-parser')
const multer = require('multer')
const upload = multer({ dest: 'uploads/' })

app.use(bodyParser.urlencoded({ extended: true }))

const log = (req) => {
  console.log(
    `url: ${req.url} method: ${req.method} second: ${new Date().getSeconds()}`
  )
}
const sleep = (second) => new Promise(resolve => setTimeout(resolve, second * 1000))

app.get('/', (req, res) => {
  log(req)
  return res.json({ message: 'hello world' })
})

app.get('/sleep', async (req, res) => {
  log(req)
  await sleep(1)
  return res.json({ message: 'hello world' })
})

app.post('/', (req, res) => {
  log(req)
  return res.json(req.body)
})

app.post('/upload', upload.single('file'), (req, res) => {
  log(req)
  return res.send(req.file.originalname)
})

app.listen(5000, () => console.log('Example app listening on port 5000!'))
expressサーバーを起動します。
$ node app.js
Example app listening on port 5000!
curlで動作確認
GET /
curl localhost:5000 \
-w "\n%{time_total}\n"
$ curl localhost:5000 \
> -w "\n%{time_total}\n"
{"message":"hello world"}
0.004826GET /sleep
curl localhost:5000/sleep \
-w "\n%{time_total}\n"
$ curl localhost:5000/sleep \
> -w "\n%{time_total}\n"
{"message":"hello world"}
1.006174POST /
curl localhost:5000 \
-XPOST \
-H 'Content-Type: application/x-www-form-urlencoded' \
-d 'message=hello world' \
-w "\n%{time_total}\n"
$ curl localhost:5000 \
> -XPOST \
> -H 'Content-Type: application/x-www-form-urlencoded' \
> -d 'message=hello world' \
> -w "\n%{time_total}\n"
{"message":"hello world"}
0.005452POST /upload
10KBのファイル と 10MBのファイル を用意します。
$ ls -lh | grep dummy
-rw-r--r--  1 xxx  xxx    10K Jul 26 10:17 dummy10KB.file
-rw-r--r--  1 xxx  xxx    10M Jul 26 10:16 dummy10MB.file
curl localhost:5000/upload \
-F "file=@./dummy10MB.file" \
-w "\n%{time_total}\n"$ curl localhost:5000/upload \
> -F "file=@./dummy10KB.file" \
> -w "\n%{time_total}\n"
dummy10KB.file
0.006415$ curl localhost:5000/upload \
> -F "file=@./dummy10MB.file" \
> -w "\n%{time_total}\n"
dummy10MB.file
0.037135wrkで負荷テスト
wrkは、C言語で書かれたベンチマークツールです。
Macにインストール
macにwrkをインストールします。
$ git clone https://github.com/wg/wrk.git
$ cd wrk
$ make -j4
実行(GET)
コマンド例
./wrk -t 1 \
-c 2 \
-d 10s \
--latency \
"http://localhost:5000"
1thread で 2つのhttp connection を確立して、10秒間リクエストを送ります。
実行結果
$ ./wrk -t 1 \
> -c 2 \
> -d 10s \
> --latency \
> "http://localhost:5000"
Running 10s test @ http://localhost:5000
  1 threads and 2 connections
  Thread Stats   Avg      Stdev     Max   +/- Stdev
    Latency   151.68us  150.08us   8.57ms   96.01%
    Req/Sec    13.91k     2.16k   15.87k    92.08%
  Latency Distribution
     50%  124.00us
     75%  144.00us
     90%  209.00us
     99%  487.00us
  139728 requests in 10.10s, 31.58MB read
Requests/sec:  13834.21
Transfer/sec:      3.13MB
レイテンシ[Latency] スループット(rps [Req/Sec]) など確認できます。
10.10s 間で合計 139728 requests を送っています。
--latencyオプション を設定しているため 75% 144.00us といったパーセンタイル表示が追加されます。
e.g.) 総リクエストが100リクエストであるケースで80パーセンタイルが指すデータ
→ データを小さい順に並べて、80番目の位置にあるデータ
結果の違いを確認するために、今度は http://localhost:5000/sleep のパスで動作確認します。
$ ./wrk -t 1 \
> -c 2 \
> -d 10s \
> --latency \
> "http://localhost:5000/sleep"
Running 10s test @ http://localhost:5000/sleep
  1 threads and 2 connections
  Thread Stats   Avg      Stdev     Max   +/- Stdev
    Latency     1.00s     1.96ms   1.01s    55.00%
    Req/Sec     1.10      0.32     2.00     90.00%
  Latency Distribution
     50%    1.00s
     75%    1.00s
     90%    1.01s
     99%    1.01s
  20 requests in 10.08s, 4.63KB read
Requests/sec:      1.98
Transfer/sec:     470.43B
10.08s 間で合計 20 requests を送っています。
実行(POST)
luaスクリプトを用意します。post.lua というファイルを作成して以下処理を記述します。
wrk.method = "POST"
wrk.body   = "message=hello world"
wrk.headers["Content-Type"] = "application/x-www-form-urlencoded"
コマンド例
-sオプション で先ほど作成した post.lua を指定しています。
./wrk -t 1 \
-c 2 \
-d 10s \
-s ./post.lua \
--latency \
"http://localhost:5000"
実行結果
$ ./wrk -t 1 \
> -c 2 \
> -d 10s \
> -s ./post.lua \
> --latency \
> "http://localhost:5000"
Running 10s test @ http://localhost:5000
  1 threads and 2 connections
  Thread Stats   Avg      Stdev     Max   +/- Stdev
    Latency   200.31us  377.34us  16.56ms   99.13%
    Req/Sec    10.83k     1.24k   11.88k    92.08%
  Latency Distribution
     50%  162.00us
     75%  181.00us
     90%  256.00us
     99%  549.00us
  108892 requests in 10.10s, 24.61MB read
Requests/sec:  10781.80
Transfer/sec:      2.44MB
実行(ファイルアップロード)
luaスクリプトを用意します。post_file_upload.lua というファイルを作成して以下処理を記述します。
function read_txt_file(path)
    local file, errorMessage = io.open(path, "r")
    if not file then
        error("Could not read the file:" .. errorMessage .. "\n")
    end

    local content = file:read "*all"
    file:close()
    return content
end

local Boundary = "----WebKitFormBoundaryePkpFF7tjBAqx29L"
local BodyBoundary = "--" .. Boundary
local LastBoundary = "--" .. Boundary .. "--"

local CRLF = "\r\n"

local FileBody = read_txt_file("dummy10MB.file")
local Filename = "dummy10MB.file"

local ContentDisposition = "Content-Disposition: form-data; name=\"file\"; filename=\"" .. Filename .. "\""

wrk.method = "POST"
wrk.headers["Content-Type"] = "multipart/form-data; boundary=" .. Boundary
wrk.body = BodyBoundary .. CRLF .. ContentDisposition .. CRLF .. CRLF .. FileBody .. CRLF .. LastBoundary
How to test upload 3MB file? · Issue #274 · wg/wrk を参考にしています。
また、dummy10MB.file を post_file_upload.lua が存在する同一階層のフォルダにコピーしています。
コマンド例
-sオプション で先ほど作成した post_file_upload.lua を指定しています。
./wrk -t 1 \
-c 2 \
-d 10s \
-s ./post_file_upload.lua \
--latency \
"http://localhost:5000/upload"
実行結果
$ ./wrk -t 1 \
> -c 2 \
> -d 10s \
> -s ./post_file_upload.lua \
> --latency \
> "http://localhost:5000/upload"
Running 10s test @ http://localhost:5000/upload
  1 threads and 2 connections
  Thread Stats   Avg      Stdev     Max   +/- Stdev
    Latency    22.95ms    3.39ms  56.30ms   89.58%
    Req/Sec    87.17     10.77   101.00     74.00%
  Latency Distribution
     50%   21.89ms
     75%   24.48ms
     90%   26.32ms
     99%   36.07ms
  871 requests in 10.01s, 185.43KB read
Requests/sec:     87.05
Transfer/sec:     18.53KB
vegetaで負荷テスト
vegetaは、Goで書かれたベンチマークツールです。
Macにインストール
macにvegetaをインストールします。
$ brew update && brew install vegetaインストールできました。
$ vegeta -version
Version: 12.8.3
Commit:
Runtime: go1.14 darwin/amd64
Date: 2020-03-25T14:41:40Z
実行(GET)
vegeta -h で使い方を確認したところ、以下examplesが表示されていたので、こちらの動作確認をしてみます。
examples:
  echo "GET http://localhost/" | vegeta attack -duration=5s | tee results.bin | vegeta report
  vegeta report -type=json results.bin > metrics.json
  cat results.bin | vegeta plot > plot.html
  cat results.bin | vegeta report -type="hist[0,100ms,200ms,300ms]"
examplesでは、vegetaの3つのコマンド( attack report plot )を利用しています。
attackコマンド- リクエストが実行され負荷をかけます。
reportコマンド- results.binの内容をもとに
text形式(デフォルト)json形式(-type=json)hist形式(-type="hist[0,100ms,200ms,300ms]")に整形して出力します。
- results.binの内容をもとに
plotコマンド- results.binの内容をもとに、グラフが書かれた
html形式の内容を出力します。
- results.binの内容をもとに、グラフが書かれた
attackコマンド実行
http://localhost:5000 にリクエストしてみます。
$ echo "GET http://localhost:5000" | vegeta attack -duration=5s | tee results.bin | vegeta report
Requests      [total, rate, throughput]         250, 50.21, 50.21
Duration      [total, attack, wait]             4.979s, 4.979s, 641.457µs
Latencies     [min, mean, 50, 90, 95, 99, max]  214.128µs, 664.866µs, 615.345µs, 938.15µs, 966.637µs, 1.082ms, 8.451ms
Bytes In      [total, mean]                     6250, 25.00
Bytes Out     [total, mean]                     0, 0.00
Success       [ratio]                           100.00%
Status Codes  [code:count]                      200:250
Error Set:
$
$ ls -l
total 264
-rw-r--r--  1 xxx  xxx  70078 Jul 26 11:41 results.bin
4.979s 間で合計 250 requests を送っています。rps は 50.21 です。
reportコマンド実行
reportコマンド を利用して results.bin を整形してみます。
$ vegeta report -type=json results.bin > metrics.json
$
$ ls -l
total 272
-rw-r--r--  1 xxx  xxx    499 Jul 26 11:45 metrics.json
-rw-r--r--  1 xxx  xxx  70078 Jul 26 11:41 results.bin
$ cat results.bin | vegeta report -type="hist[0,100ms,200ms,300ms]"
Bucket # % Histogram
[0s, 100ms] 250 100.00% ###########################################################################
[100ms, 200ms] 0 0.00%
[200ms, 300ms] 0 0.00%
[300ms, +Inf] 0 0.00% plotコマンド実行
plotコマンド を利用して results.bin からグラフを生成してみます。
$ cat results.bin | vegeta plot > plot.html
$
$ ls -l
total 864
-rw-r--r--  1 xxx  xxx     499 Jul 26 11:45 metrics.json
-rw-r--r--  1 xxx  xxx  300232 Jul 26 11:46 plot.html
-rw-r--r--  1 xxx  xxx   70078 Jul 26 11:41 results.bin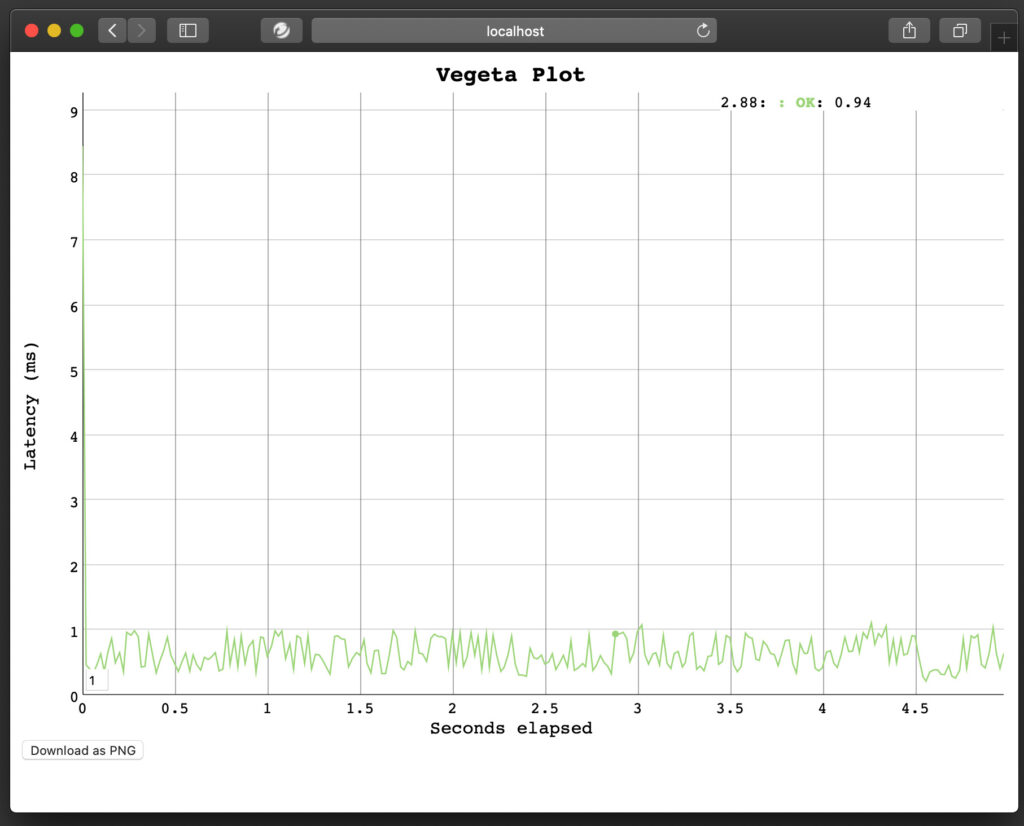
ブラウザでの確認結果です。