Postmanは、APIの開発、テスト、ドキュメント作成などを支援するツールです。効率的なAPI開発に役立ちます。
ここでは、簡単なAPIリクエストを作成して、テストを実行してみます。NewmanというCLIツールを活用してテストする方法も取り上げます。
基礎知識
はじめに、Postmanの基礎知識について確認します。多機能ですが、特に抑えておきたい知識だけ取り上げます。
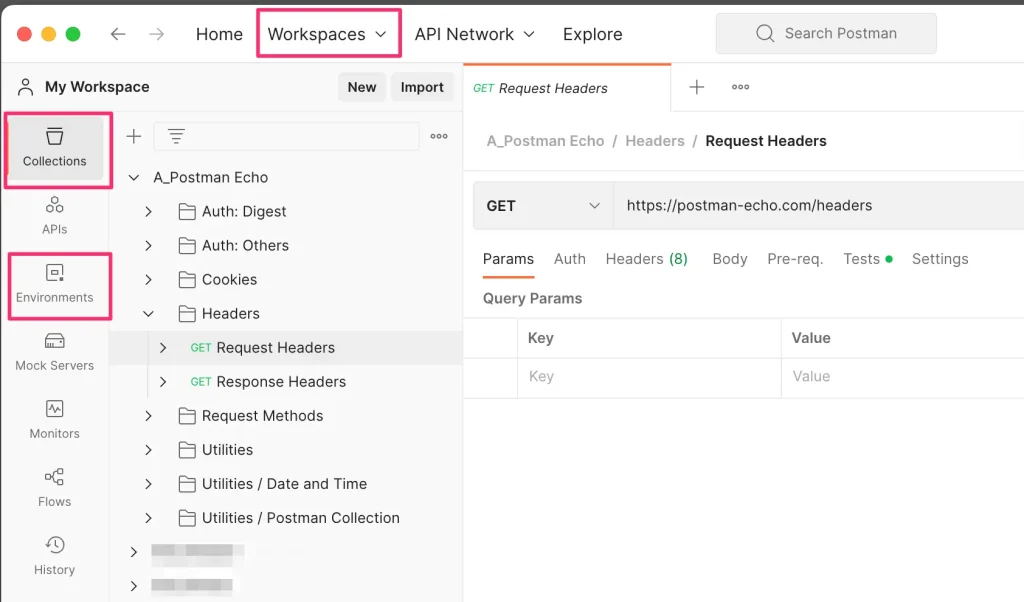
Workspaces
(共同作業に活用)
Workspace内にCollection, Environmentなどを作成します。Workspaceは、他の開発者に共有することができます。
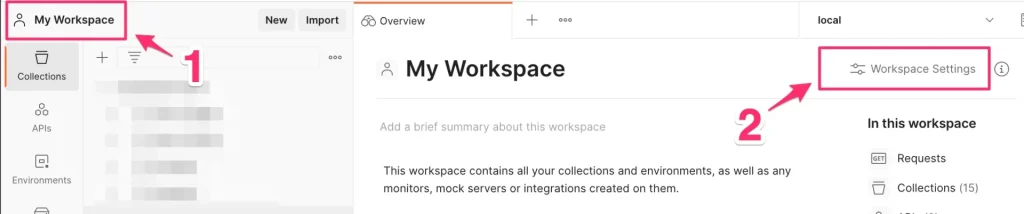
Visibilityの変更
他の開発者にWorkspaceを共有したいときは、Visibilityを変更します。VisiblityはWorkspace Settingsから変更できます。
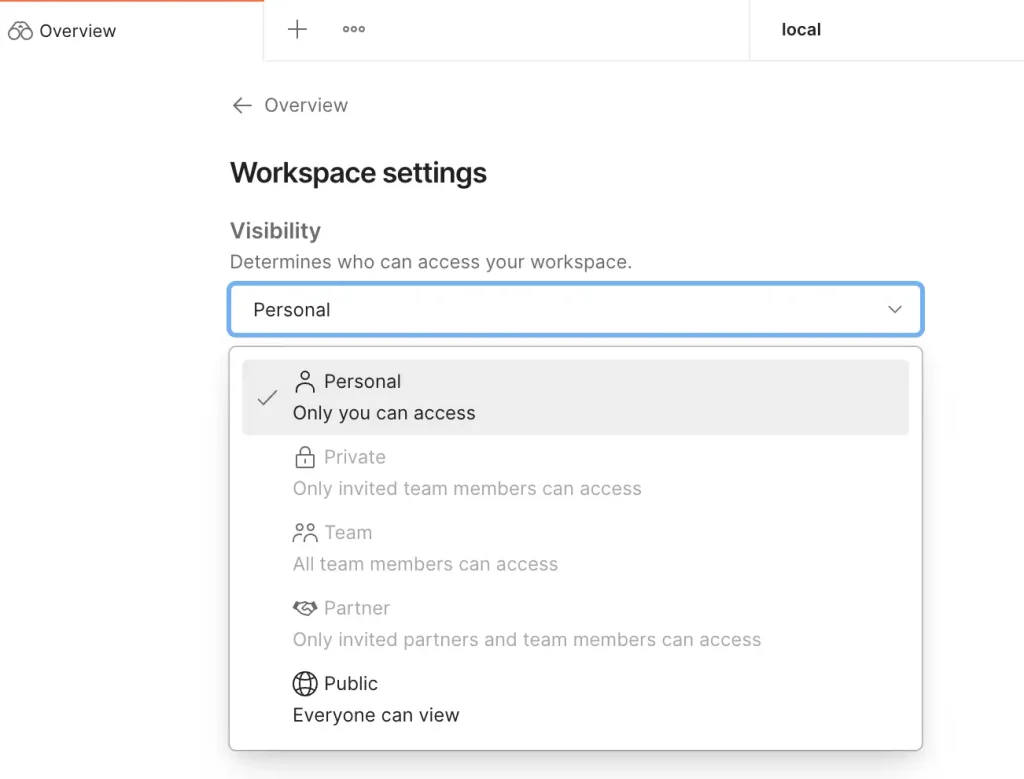
- Personal
- デフォルト。個人用。
- Private
- 招待したチームメンバーのみアクセス可能。
- Team
- チーム全員アクセス可能。
- Partner
- 招待されたチームメンバーとパートナーのみがアクセス可能。
- Public
- 全員アクセス可能。
参考: https://learning.postman.com/docs/getting-started/creating-your-first-workspace/
Collections
(リクエスト整理に活用)

Collection内にRequestを作成します。
Collection内には、Folderも作成できます。大量にリクエストが存在する場合、Folderを活用して整理できます。
Environments
(local, devなどの環境変更に活用)
local環境、dev環境などで別々の変数を設定したいケースに利用します。domainなどの変数で活用できます。
現在アクティブな環境は以下で確認できます。

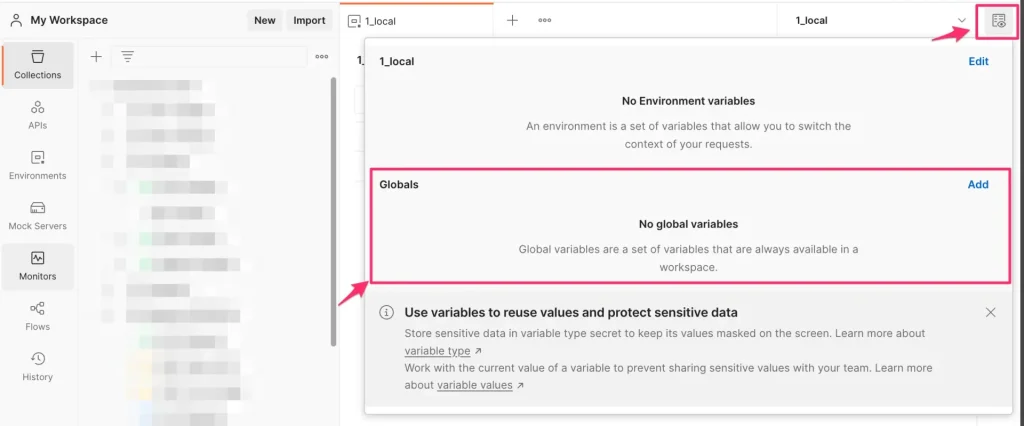
変数のスコープ
リクエストエンドポイントを設定するとき変数を活用できます。xxx という変数を利用したいときは、{{xxx}} と指定します。
Postmanを活用する上で知っておきたいのが、変数のスコープです。以下のスコープが存在します。
グローバル変数
  コレクション変数
    環境変数
      データ変数(外部のCSV, JSONファイルから取得)
        ローカル変数
グローバル変数の設定
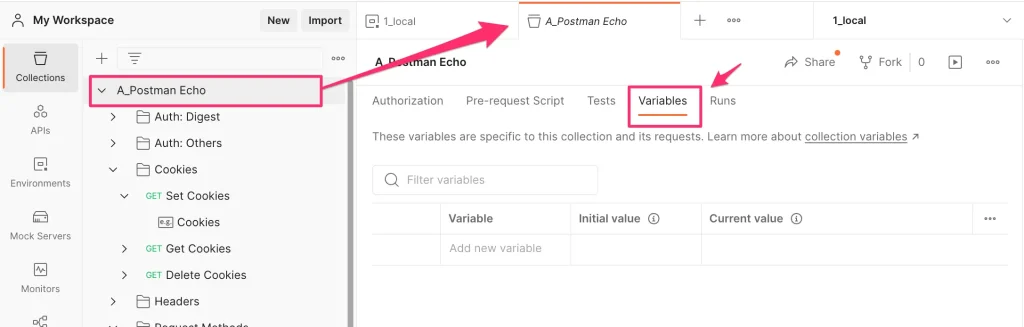
コレクション変数の設定
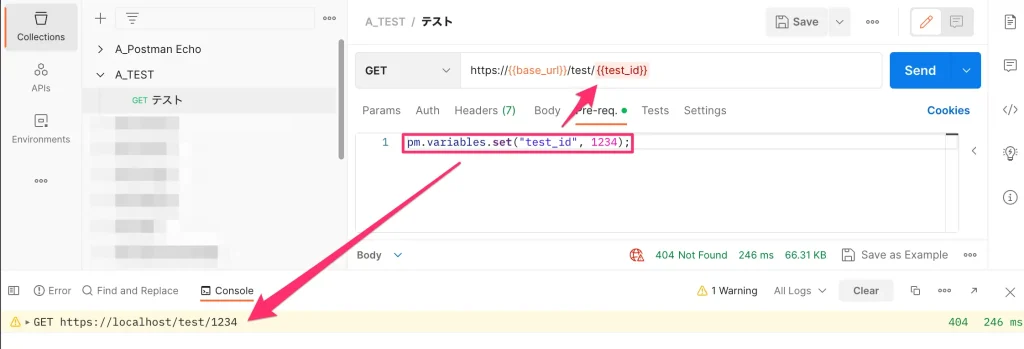
ローカル変数の設定
ローカル変数は、Pre-Request Scriptで設定できます。
以下では、pm.variables.set("test_id", 1234); と指定することで、{{test_id}}の値を設定してます。
参考: https://learning.postman.com/docs/sending-requests/variables/#variable-scopes
動作確認
サーバー側コード
node.jsでサーバー側のコードを用意します。必要なパッケージをインストールします。
npm init
npm install --save express cookie-parser
app.js を作成して、以下処理を記述します。
const express = require('express');
const cookieParser = require('cookie-parser');

const app = express();
app.use(express.json());
app.use(cookieParser());

// ログインAPI
app.post('/login', (req, res) => {
    const { id, password } = req.body;

    // ログイン処理(ここでは簡略化しています)
    if (id === 'ユーザーID' && password === 'パスワード') {
        // セッションCookieの設定
        res.cookie('session', 'セッションの値', {
            httpOnly: true,
        });
        res.status(200).json({ message: 'ログイン成功' });
    } else {
        res.status(401).json({ message: 'ログイン失敗' });
    }
});

// ログアウトAPI
app.post('/logout', (req, res) => {
    // セッションCookieの削除
    res.clearCookie('session');
    res.status(200).json({ message: 'ログアウト成功' });
});

// ユーザー情報取得API
app.get('/user', (req, res) => {
    // セッションCookieの存在をチェック
    const sessionCookie = req.cookies.session;
    if (sessionCookie) {
        // セッションCookieが存在する場合は、ユーザー情報を返す
        const user = {
            id: 'ユーザーID',
            name: 'ユーザー名',
            email: 'user@example.com',
        };
        res.status(200).json(user);
    } else {
        // セッションCookieが存在しない場合は、401エラーを返す
        res.status(401).json({ message: 'セッションが無効です' });
    }
});

// サーバーの起動
app.listen(3000, () => {
    console.log('サーバーがポート3000で起動しました');
});
ログインAPI、ログアウトAPI、ユーザー情報取得APIが存在します。
起動します。
$ node app.js
サーバーがポート3000で起動しました
login apiのテスト
login apiのリクエストを設定します。
以下、リクエストボディを設定しています。
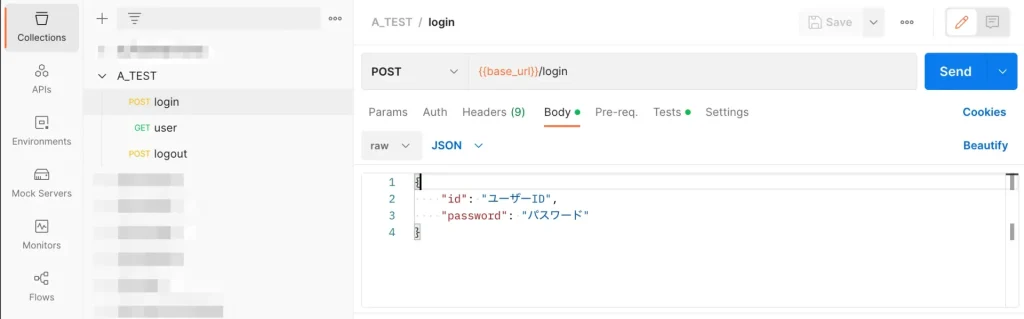
Testsにリクエスト結果のテストを記載します。ここでは、以下、レスポンスステータスとCookieのテストを記載しました。
pm.test("Status test", function () {
    pm.response.to.have.status(200);
});

pm.test("Cookie Session is present", () => {
  pm.expect(pm.cookies.has('SESSION')).to.be.true;
});
Sendをクリックするとリクエストされて、Tests Resultsにてテスト結果を確認できます。
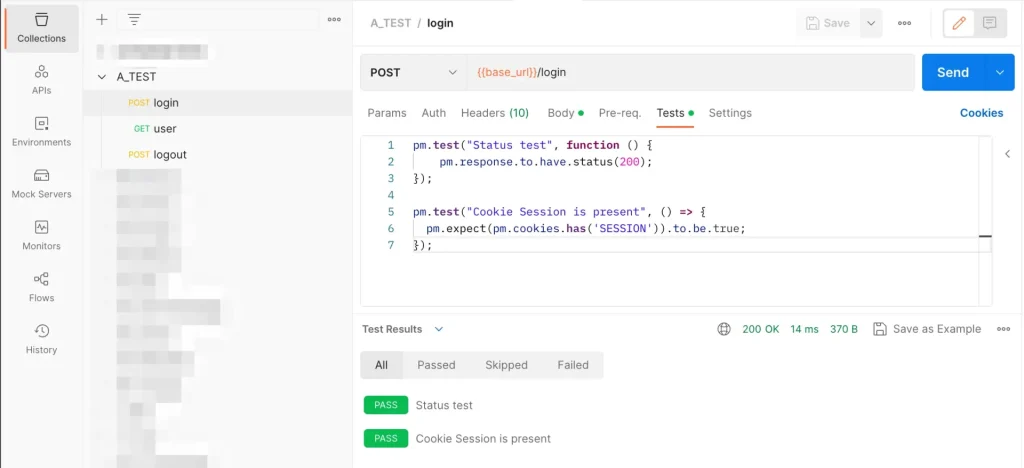
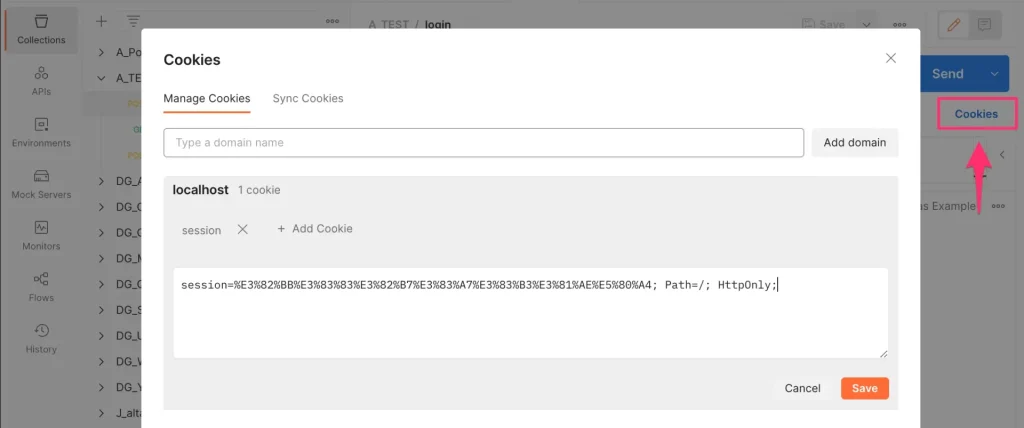
リクエスト後、Cookiesをクリックすると、設定されたCookieを確認できます。
user apiのテスト
user apiのリクエストを設定します。
Testsには、以下、レスポンスステータスとレスポンスボディのテストを記載しました。
pm.test("Status test", function () {
    pm.response.to.have.status(200);
});

console.log(pm.response.json());
pm.test("Body test", function () {
    pm.response.to.have.jsonBody("name");

    const responseBody = pm.response.json();
    pm.expect(responseBody.name).to.eql("ユーザー名");
});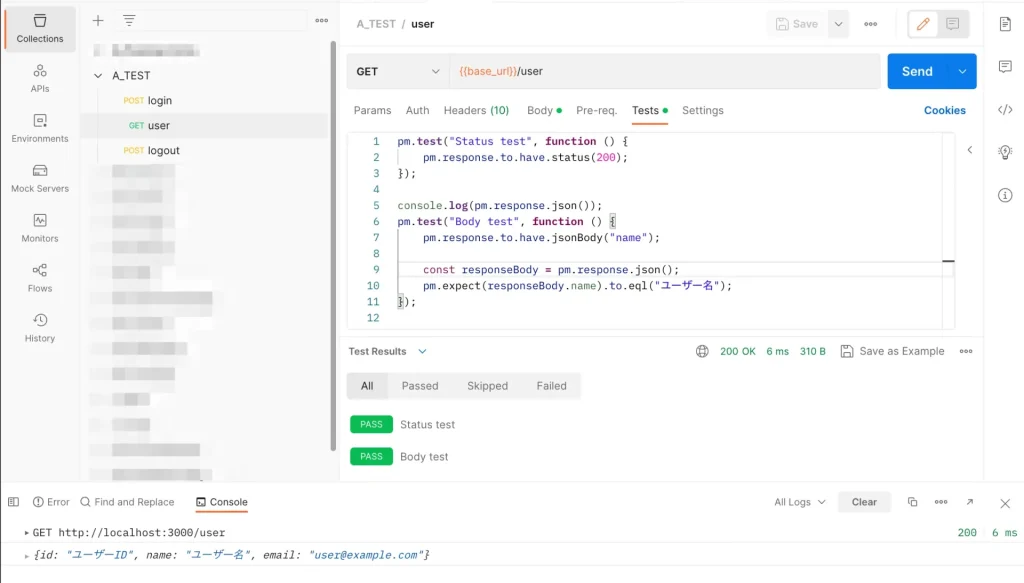
先にloginAPIを実行したので、Cookieが設定済みのため、リクエスト成功(200)しました。console.logの結果はFooterのConsoleから確認できます。
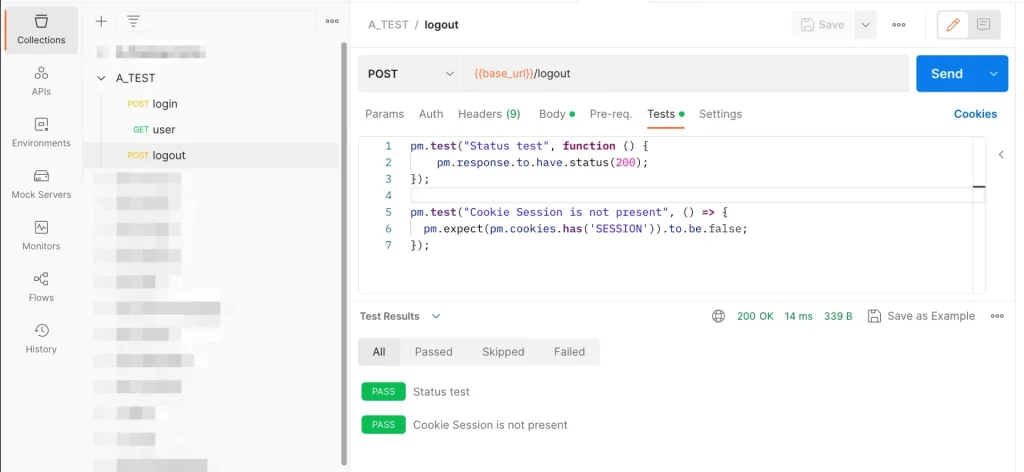
logout apiのテスト
logout apiのリクエストを設定します。
Testsには、以下、レスポンスステータスとCookieのテストを記載しました。
pm.test("Status test", function () {
    pm.response.to.have.status(200);
});

pm.test("Cookie Session is not present", () => {
  pm.expect(pm.cookies.has('SESSION')).to.be.false;
});
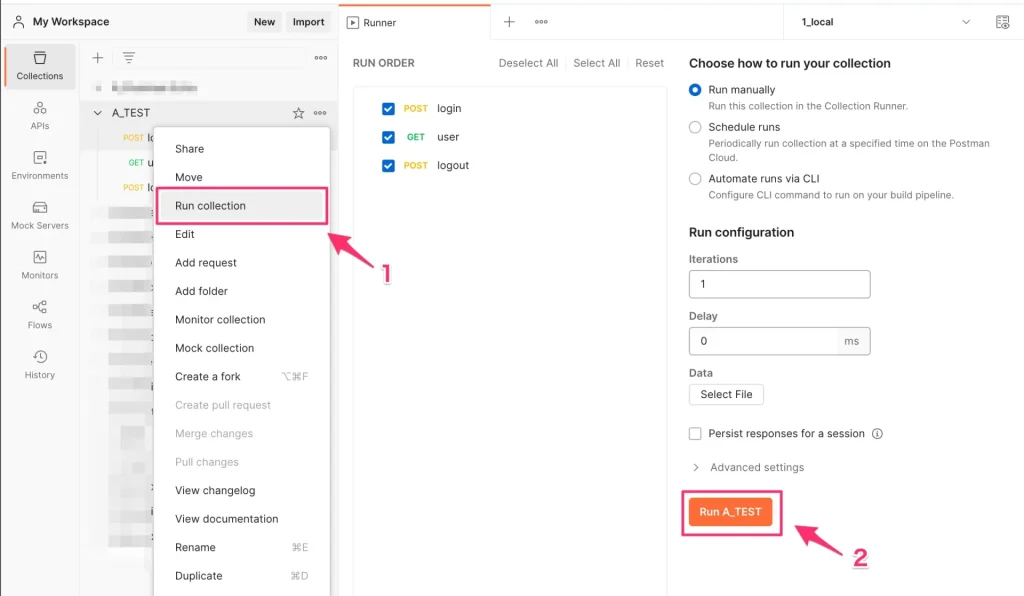
Collection内のリクエストをまとめてテスト
以下のように、Collection内に作成したリクエストをまとめてテストすることができます。
Newmanでテスト
https://github.com/postmanlabs/newman
Newmanは、PostmanのCollectionをコマンドラインで実行するためのツールです。
先ほど作成したCollectionをNewmanでテストしてみます。
Newmanのインストール
npm install -g newmanCollectionのExport
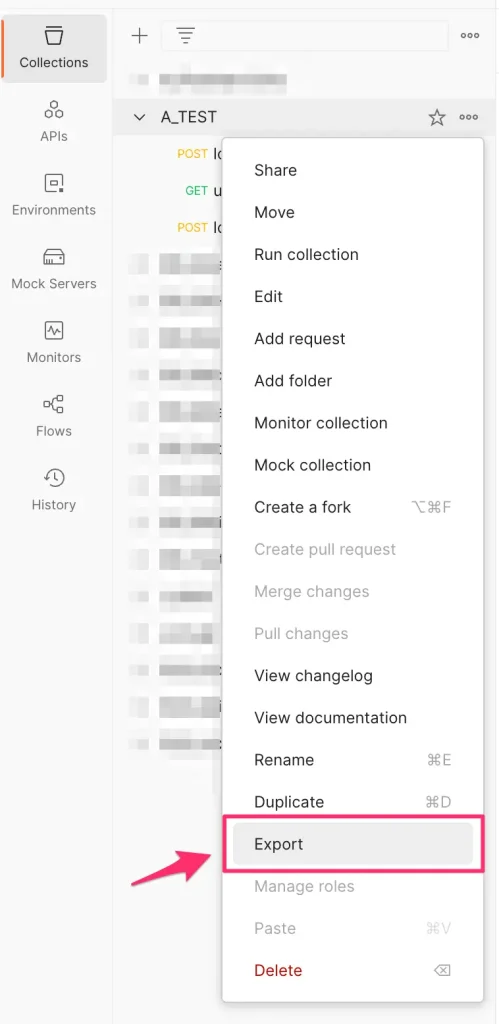
CollectionをExportします。
A_TEST.postman_collection.json というファイルがエクスポートされました。
Newmanでテスト
newmanで、エクスポートしたファイルを指定してリクエスト実行します。
$ newman run A_TEST.postman_collection.json
newman

A_TEST

→ login
  POST http://localhost:3000/login [200 OK, 370B, 27ms]
  ✓  Status test
  ✓  Cookie Session is present

→ user
  GET http://localhost:3000/user [200 OK, 310B, 3ms]
  ✓  Status test
  ┌
  │ { id: 'ユーザーID', name: 'ユーザー名', email: 'user@example.com' }
  └
  ✓  Body test

→ logout
  POST http://localhost:3000/logout [200 OK, 339B, 2ms]
  ✓  Status test
  ✓  Cookie Session is not present

┌─────────────────────────┬──────────────────┬──────────────────┐
│                         │         executed │           failed │
├─────────────────────────┼──────────────────┼──────────────────┤
│              iterations │                1 │                0 │
├─────────────────────────┼──────────────────┼──────────────────┤
│                requests │                3 │                0 │
├─────────────────────────┼──────────────────┼──────────────────┤
│            test-scripts │                6 │                0 │
├─────────────────────────┼──────────────────┼──────────────────┤
│      prerequest-scripts │                6 │                0 │
├─────────────────────────┼──────────────────┼──────────────────┤
│              assertions │                6 │                0 │
├─────────────────────────┴──────────────────┴──────────────────┤
│ total run duration: 96ms                                      │
├───────────────────────────────────────────────────────────────┤
│ total data received: 142B (approx)                            │
├───────────────────────────────────────────────────────────────┤
│ average response time: 10ms [min: 2ms, max: 27ms, s.d.: 11ms] │
└───────────────────────────────────────────────────────────────┘
フォルダーを指定してテスト
Newmanを使用してリクエスト実行する場合、コレクション内のすべてのリクエストが実行されます。
コレクション内の特定のリクエストだけ実行したいケースもあります。
その場合、コレクション内でフォルダを作成して、Newman実行時に --folderオプション を使用します。
newman run [コレクションファイル] --folder [フォルダ名]その他オプション
その他のオプションは、newman run -h で確認できます。
$ newman run -h
Usage: newman run <collection> [options]

Initiate a Postman Collection run from a given URL or path

Options:
  -e, --environment <path>              Specify a URL or path to a Postman Environment
  -g, --globals <path>                  Specify a URL or path to a file containing Postman Globals
  -r, --reporters [reporters]           Specify the reporters to use for this run (default: ["cli"])
  -n, --iteration-count <n>             Define the number of iterations to run
  -d, --iteration-data <path>           Specify a data file to use for iterations (either JSON or CSV)
  --folder <path>                       Specify the folder to run from a collection. Can be specified multiple times to run multiple folders (default: [])
  --global-var <value>                  Allows the specification of global variables via the command line, in a key=value format (default: [])
  --env-var <value>                     Allows the specification of environment variables via the command line, in a key=value format (default: [])
  --export-environment <path>           Exports the final environment to a file after completing the run
  --export-globals <path>               Exports the final globals to a file after completing the run
  --export-collection <path>            Exports the executed collection to a file after completing the run
  --postman-api-key <apiKey>            API Key used to load the resources from the Postman API
  --bail [modifiers]                    Specify whether or not to gracefully stop a collection run on encountering an error and whether to end the run with an error based on the
                                        optional modifier
  --ignore-redirects                    Prevents Newman from automatically following 3XX redirect responses
  -x , --suppress-exit-code             Specify whether or not to override the default exit code for the current run
  --silent                              Prevents Newman from showing output to CLI
  --disable-unicode                     Forces Unicode compliant symbols to be replaced by their plain text equivalents
  --color <value>                       Enable/Disable colored output (auto|on|off) (default: "auto")
  --delay-request [n]                   Specify the extent of delay between requests (milliseconds) (default: 0)
  --timeout [n]                         Specify a timeout for collection run (milliseconds) (default: 0)
  --timeout-request [n]                 Specify a timeout for requests (milliseconds) (default: 0)
  --timeout-script [n]                  Specify a timeout for scripts (milliseconds) (default: 0)
  --working-dir <path>                  Specify the path to the working directory
  --no-insecure-file-read               Prevents reading the files situated outside of the working directory
  -k, --insecure                        Disables SSL validations
  --ssl-client-cert-list <path>         Specify the path to a client certificates configurations (JSON)
  --ssl-client-cert <path>              Specify the path to a client certificate (PEM)
  --ssl-client-key <path>               Specify the path to a client certificate private key
  --ssl-client-passphrase <passphrase>  Specify the client certificate passphrase (for protected key)
  --ssl-extra-ca-certs <path>           Specify additionally trusted CA certificates (PEM)
  --cookie-jar <path>                   Specify the path to a custom cookie jar (serialized tough-cookie JSON)
  --export-cookie-jar <path>            Exports the cookie jar to a file after completing the run
  --verbose                             Show detailed information of collection run and each request sent
  -h, --help                            display help for command