macで pyenv と pipenv を利用して、pythonプロジェクトを構築する方法について解説します。Pythonバージョンを指定して、必要なパッケージを取り込んだ環境を作ることができるようになります。
目次
Pyenv、Pipenvとは?
- Pyenv
指定バージョンのPythonインストールや利用するPythonバージョンの切り替えをすることができます。
- Pipenv
- pipによるパッケージ管理をPipfileを介して行います。
- PyCharm2018.2よりPipenvがサポートされました。
PyenvでPythonをインストール
Pyenvをインストール
pyenvをインストールします。
$ brew install pyenvコマンドPATHを通す
.bash_profile にpyenvのPATHを追加します。
$ sudo vi ~/.bash_profileexport PYENV_ROOT="$HOME/.pyenv"
export PATH="$PYENV_ROOT/bin:$PATH"
eval "$(pyenv init -)"設定ファイルを反映させます。
$ source ~/.bash_profilepyenvの使い方
helpで利用方法を確認できます。
$ pyenv -h
Usage: pyenv <command> [<args>]

Some useful pyenv commands are:
   commands    List all available pyenv commands
   local       Set or show the local application-specific Python version
   global      Set or show the global Python version
   shell       Set or show the shell-specific Python version
   install     Install a Python version using python-build
   uninstall   Uninstall a specific Python version
   rehash      Rehash pyenv shims (run this after installing executables)
   version     Show the current Python version and its origin
   versions    List all Python versions available to pyenv
   which       Display the full path to an executable
   whence      List all Python versions that contain the given executable

See `pyenv help <command>' for information on a specific command.
For full documentation, see: https://github.com/pyenv/pyenv#readme
指定バージョンのPythonをインストール
Python 3.6.5をインストールするには、以下のようにします。
$ pyenv install 3.6.5エラーが出た場合
下記のようなエラーが出ました。
BUILD FAILED (OS X 10.13.6 using python-build 20180424)

Inspect or clean up the working tree at /var/folders/tl/mv22zgw17dv6z81d9pzkvn880000gp/T/python-build.20180801072710.36809
Results logged to /var/folders/tl/mv22zgw17dv6z81d9pzkvn880000gp/T/python-build.20180801072710.36809.log
下記コマンド実行後、再度インストールしたら成功します。
$ xcode-select --install利用バージョンの切り替え
$ pyenv global 3.6.5$ python -V
Python 3.6.5Pipenvでパッケージ管理
Pipenvをインストール
pipenvをインストールします。
$ brew install pipenvpipenvの使い方
helpで利用方法を確認できます。
$ pipenv --help
Usage: pipenv [OPTIONS] COMMAND [ARGS]...

Options:
  --where             Output project home information.
  --venv              Output virtualenv information.
  --py                Output Python interpreter information.
  --envs              Output Environment Variable options.
  --rm                Remove the virtualenv.
  --bare              Minimal output.
  --completion        Output completion (to be eval'd).
  --man               Display manpage.
  --three / --two     Use Python 3/2 when creating virtualenv.
  --python TEXT       Specify which version of Python virtualenv should use.
  --site-packages     Enable site-packages for the virtualenv.
  --pypi-mirror TEXT  Specify a PyPI mirror.
  --support           Output diagnostic information for use in Github issues.
  --version           Show the version and exit.
  -h, --help          Show this message and exit.


Usage Examples:
   Create a new project using Python 3.6, specifically:
   $ pipenv --python 3.6

   Install all dependencies for a project (including dev):
   $ pipenv install --dev

   Create a lockfile containing pre-releases:
   $ pipenv lock --pre

   Show a graph of your installed dependencies:
   $ pipenv graph

   Check your installed dependencies for security vulnerabilities:
   $ pipenv check

   Install a local setup.py into your virtual environment/Pipfile:
   $ pipenv install -e .

   Use a lower-level pip command:
   $ pipenv run pip freeze

Commands:
  check      Checks for security vulnerabilities and against PEP 508 markers
             provided in Pipfile.
  clean      Uninstalls all packages not specified in Pipfile.lock.
  graph      Displays currently-installed dependency graph information.
  install    Installs provided packages and adds them to Pipfile, or (if none
             is given), installs all packages.
  lock       Generates Pipfile.lock.
  open       View a given module in your editor.
  run        Spawns a command installed into the virtualenv.
  shell      Spawns a shell within the virtualenv.
  sync       Installs all packages specified in Pipfile.lock.
  uninstall  Un-installs a provided package and removes it from Pipfile.
  update     Runs lock, then sync.
プロジェクトで利用するPythonバージョンの指定方法
新規プロジェクトを作成します。
$ mkdir project && cd projectプロジェクトで使用するPythonのバージョンを指定します。
(デフォルトはStableな最新版)
$ pipenv --python 3.6.5以下のように、Pipfileが生成されました。
[[source]]
url = "https://pypi.org/simple"
verify_ssl = true
name = "pypi"

[packages]

[dev-packages]

[requires]
python_version = "3.6"
パッケージインストール
numpy をインストールしてみます。
$ pipenv install numpy以下のように、 Pipfile Pipfile.lock が生成されました。
$ ls
Pipfile         Pipfile.lock

$ cat Pipfile
[[source]]
url = "https://pypi.org/simple"
verify_ssl = true
name = "pypi"

[packages]
numpy = "*"

[dev-packages]

[requires]
python_version = "3.6"
スクリプトの実行
pipenvで作られた仮想環境に入り、スクリプトを実行します。
$ pipenv shell
Launching subshell in virtual environment…
bash-3.2$  . /Users/xxx/.local/share/virtualenvs/project-KzPKfozo/bin/activate
(project-KzPKfozo) bash-3.2$ python xxxx.py
exit と入力することで仮想環境を抜けることができます。
プロジェクト環境の保存場所
下記コマンドでプロジェクト環境の保存場所を確認できます。
$ pipenv --venv~/.local/share/virtualenvs/ 以下にプロジェクトごとにディレクトリが作成されるようです。中身は以下のようになります。
$ ls ~/.local/share/virtualenvs/
project-KzPKfozo

$ ls ~/.local/share/virtualenvs/project-KzPKfozo/
bin                     include                 lib                     pip-selfcheck.json      src
下記コマンドで環境を削除できます。
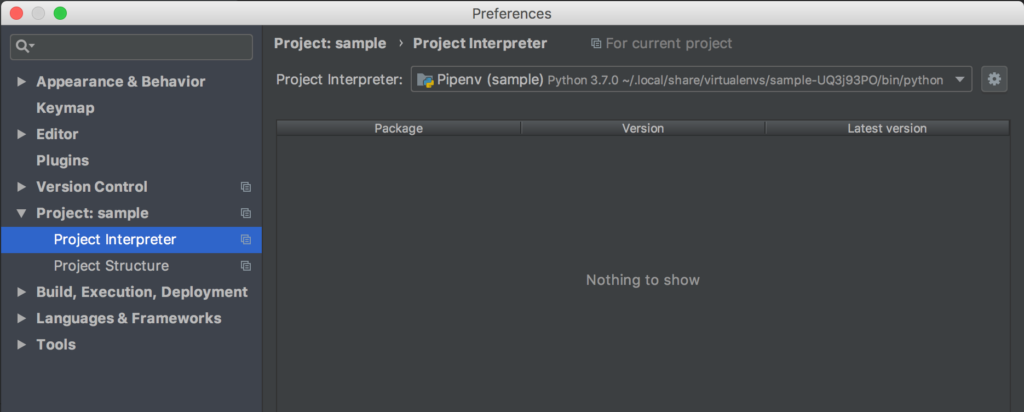
$ pipenv --rmPyCharmでPipenvを使う
PyCharm2018.2よりPipenvがサポートされました。
新規プロジェクトの場合、以下のように設定できます。
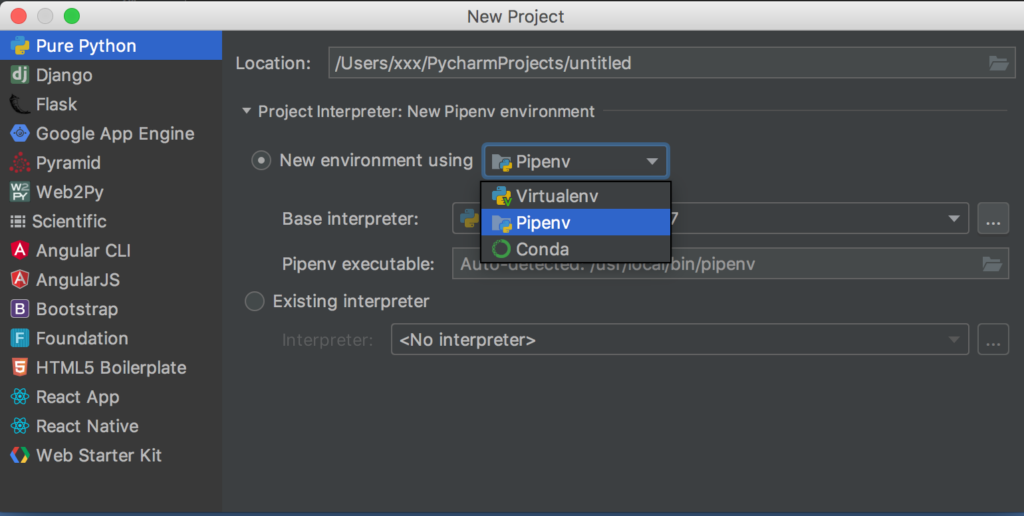
以下のように、Project Interpreterに設定されます。