aws-serverless-expressを利用することで、ExpressをLambda上で利用できるようになります。ここでは、aws-serverless-expressが提供するサンプルをもとに動作確認を行います。
サンプル環境をダウンロード
aws-serverless-express のリポジトリに存在するサンプルをもとに動作確認します。
git clone https://github.com/awslabs/aws-serverless-express.git && cd aws-serverless-express/examples/basic-starter設定調整
AWS関連の設定を調整します。下記コマンドを環境に合わせて利用します。
npm run config -- --account-id="<accountId>" \
--bucket-name="<bucketName>" \
--region="<region>"
上記コマンドを実行すると、下記ファイルの設定を調整してくれます。
package.jsoncloudformation.yamlsimple-proxy-api.yamlcloudformation.yamlのDefinitionUriで指定
バケット生成 & デプロイ
下記コマンドでデプロイできます。
npm run setupコマンド実行したときに、package.json から実行される処理を抜粋します。
{
  "scripts": {
    "create-bucket": "aws s3 mb s3://$npm_package_config_s3BucketName --region $npm_package_config_region",
    "package": "aws cloudformation package --template ./cloudformation.yaml --s3-bucket $npm_package_config_s3BucketName --output-template packaged-sam.yaml --region $npm_package_config_region",
    "deploy": "aws cloudformation deploy --template-file packaged-sam.yaml --stack-name $npm_package_config_cloudFormationStackName --capabilities CAPABILITY_IAM --region $npm_package_config_region",
    "package-deploy": "npm run package && npm run deploy",
    "setup": "npm install && (aws s3api get-bucket-location --bucket $npm_package_config_s3BucketName --region $npm_package_config_region || npm run create-bucket) && npm run package-deploy",
  }
}
下記操作を行なっているようです。
- S3バケットの生成
- CloudFormationのテンプレートをS3にアップ
- CloudFormationのデプロイ実行
AWS操作は、default のprofileで行われます。もし、違う認証情報でAWS操作したい場合、以下のようにenvで指定する方法をとると良いです。
env AWS_ACCESS_KEY_ID=<AWS_ACCESS_KEY_ID> \
AWS_SECRET_ACCESS_KEY=<AWS_SECRET_ACCESS_KEY> \
npm run setup
デプロイされた内容確認
CloudFormationのスタック
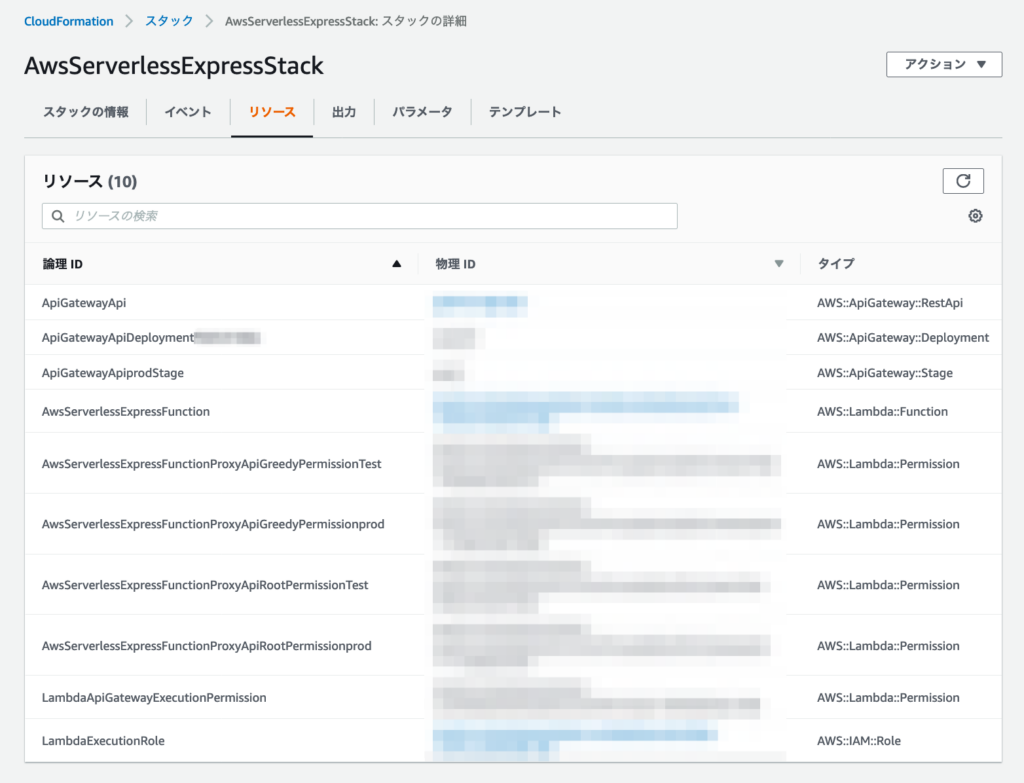
AwsServerlessExpressStackというスタックが生成されました。
API Gateway

API Gatewayのエンドポイントは1つだけです。
このエンドポイントから実行されるLambdaのExpress内部でルーティングに対応した処理を実行します。
API実行
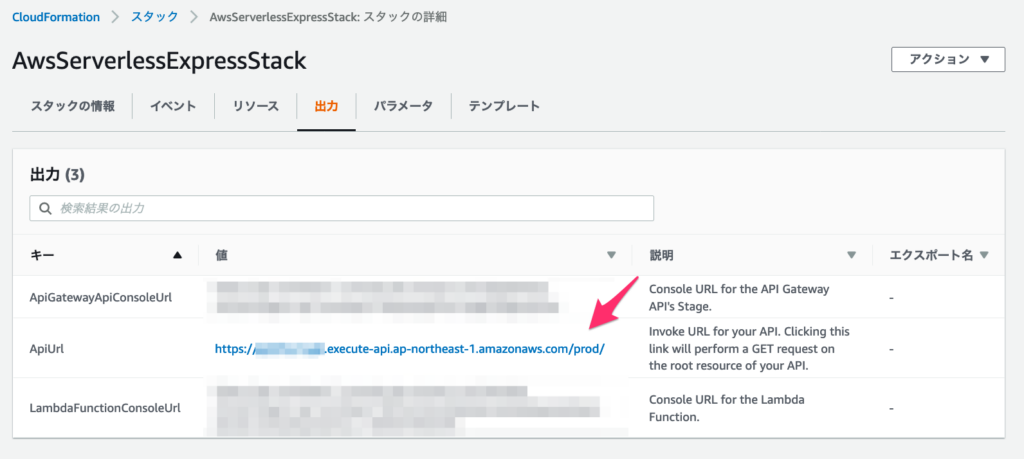
APIのエンドポイントは、CloudFormationの出力タブの ApiUrl で確認できます。
確認した ApiUrl をもとに以下のように動作確認できます。
$ curl https://xxxxxxxxxx.execute-api.ap-northeast-1.amazonaws.com/prod/users -H 'accept: application/json'
[{"id":1,"name":"Joe"},{"id":2,"name":"Jane"}]$
$ curl https://xxxxxxxxxx.execute-api.ap-northeast-1.amazonaws.com/prod/users -X POST -d '{"name":"Sam"}' -H 'accept: application/json'
{"id":3}$ curl https://xxxxxxxxxx.execute-api.ap-northeast-1.amazonaws.com/prod/users/3 -H 'accept: application/json'
{"id":3}$ curl https://xxxxxxxxxx.execute-api.ap-northeast-1.amazonaws.com/prod/users/3 -X DELETE -H 'accept: application/json'
[{"id":1,"name":"Joe"},{"id":2,"name":"Jane"}]$スタック削除
下記コマンドで、今回作成したCloudFormationのスタックを削除できます。
npm run delete-stack補足|関連コード
( aws-serverless-express )
aws-serverless-express を利用して、Lambda環境を構築する際に確認しておきたい処理、設定を抜粋します。
app.js
( ミドルを追加 )
app.js から aws-serverless-express 関連の処理を抜粋します。
'use strict'
const express = require('express')
const awsServerlessExpressMiddleware = require('aws-serverless-express/middleware')
const app = express()
const router = express.Router()

router.use(awsServerlessExpressMiddleware.eventContext())

router.get('/users', (req, res) => {
  res.json(users)
})

const users = [{
  id: 1,
  name: 'Joe'
}, {
  id: 2,
  name: 'Jane'
}]

// The aws-serverless-express library creates a server and listens on a Unix
// Domain Socket for you, so you can remove the usual call to app.listen.
// app.listen(3000)
app.use('/', router)

// Export your express server so you can import it in the lambda function.
module.exports = app
aws-serverless-express のミドルを追加しています。
lambda.js
( サーバー作成 )
lambda.js から aws-serverless-express 関連の処理を抜粋します。
'use strict'
const awsServerlessExpress = require('aws-serverless-express')
const app = require('./app')

// NOTE: If you get ERR_CONTENT_DECODING_FAILED in your browser, this is likely
// due to a compressed response (e.g. gzip) which has not been handled correctly
// by aws-serverless-express and/or API Gateway. Add the necessary MIME types to
// binaryMimeTypes below, then redeploy (`npm run package-deploy`)
const binaryMimeTypes = [
  'application/javascript',
  'application/json',
  'application/octet-stream',
  'application/xml',
  'font/eot',
  'font/opentype',
  'font/otf',
  'image/jpeg',
  'image/png',
  'image/svg+xml',
  'text/comma-separated-values',
  'text/css',
  'text/html',
  'text/javascript',
  'text/plain',
  'text/text',
  'text/xml'
]
const server = awsServerlessExpress.createServer(app, null, binaryMimeTypes)
exports.handler = (event, context) => awsServerlessExpress.proxy(server, event, context)
express で listen するのではなく、aws-serverless-express でサーバーを作っていることがわかります。
cloudformation.yaml
cloudformation.yaml から関連ある設定を抜粋します。
  AwsServerlessExpressFunction:
    Type: AWS::Serverless::Function
    Properties:
      CodeUri: ./
      Handler: lambda.handler
      MemorySize: 1024
      Role: !GetAtt LambdaExecutionRole.Arn
      Runtime: nodejs8.10
      Timeout: 30
      Events:
        ProxyApiRoot:
          Type: Api
          Properties:
            RestApiId: !Ref ApiGatewayApi
            Path: /
            Method: ANY
        ProxyApiGreedy:
          Type: Api
          Properties:
            RestApiId: !Ref ApiGatewayApi
            Path: /{proxy+}
            Method: ANY
Handler で lambda.js の handler を指定しています。